Keeping your screen brightness at a comfortable level not only improves visibility and reduces eye strain, but also extends battery life on laptops and contributes to overall energy efficiency. In this guide, we’ll explore the various ways to adjust brightness on both laptops and desktops running Windows 11, including helpful tips, accessibility options, and bonus tricks that many users overlook.
- 1 Adjusting Brightness on a Laptop
- 2 Adjusting Brightness on a Desktop Monitor
- 3 Bonus Feature: Reduce Eye Strain with Night Light
- 4 Accessibility Options for Vision Support
- 5 Final Thoughts
Adjusting Brightness on a Laptop
If you are using a Windows 11 laptop, there are several quick and convenient ways to control screen brightness.
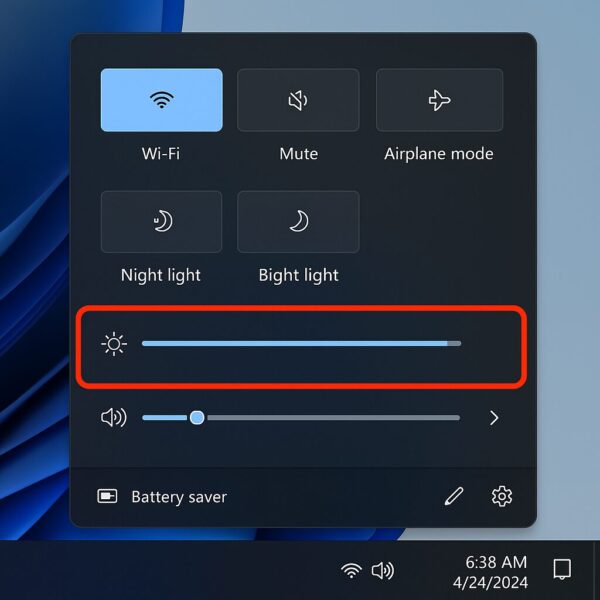
Method 1: Use the Quick Settings Panel
- Press Windows key + A to open the Quick Settings menu.
- Locate the Brightness slider.
- Drag the slider left to dim the screen, or right to increase brightness.
This is the fastest way to adjust brightness manually.
Pro Tip: You can also click the battery icon in the taskbar and select the brightness slider from there. If the slider is missing, try expanding the panel with the small arrow icon.
Method 2: Adjust via Settings
- Press Windows + I to open Settings.
- Go to System > Display.
- Under Brightness & color, use the Change brightness slider.
⚠️Note: Some desktop PCs and external monitors won’t show this slider. If it’s missing, scroll down for desktop-specific instructions.
Method 3: Use Keyboard Shortcut (if available)
Most modern laptops have dedicated brightness keys, usually located on the top row (Function keys). Look for keys marked with a sun icon or brightness symbol.
- On many devices, you may need to press Fn + Brightness Key (e.g., Fn + F6 or F7) to adjust brightness.
Tip: If the brightness keys are not working, try updating your display or keyboard drivers.
Method 4: Let Windows Adjust Brightness Automatically
Windows 11 can adjust screen brightness based on ambient light or battery level.
● Enable Adaptive Brightness:
- Go to Settings > System > Display.
- Click Brightness.
- Enable Change brightness automatically when lighting changes.
This option only appears if your laptop has a light sensor.
● Enable Battery Saver Mode:
- When Battery Saver is turned on, Windows dims the screen automatically to preserve power.
- Go to Settings > System > Power & Battery > Battery Saver to customize this behavior.
Adjusting Brightness on a Desktop Monitor
Unlike laptops, desktop monitors typically don’t allow brightness adjustments through the Windows interface—unless you’re using a built-in display like on an all-in-one PC (e.g., Surface Studio). Here’s how to change brightness on external monitors.
Method 1: Use Monitor Buttons
Most standalone monitors have physical buttons or a touch-sensitive panel on the front, side, or bottom. These buttons access the monitor’s built-in On-Screen Display (OSD) menu.
- Locate the button labeled Menu, Settings, or similar.
- Navigate using the arrow buttons.
- Find the Brightness setting and adjust it up or down.
💡 Some monitors also include contrast and gamma controls—use them to fine-tune your image quality.
Method 2: Use Display Control Software
Some monitor manufacturers provide Windows software to control brightness, color, and other display settings.
Examples include:
- Dell Display Manager
- LG OnScreen Control
- BenQ Display Pilot
- HP Display Center
These tools allow brightness control using your mouse, and some can even auto-adjust based on time of day or active applications.
Method 3: Use Third-Party Tools
If your monitor doesn’t support built-in software, consider third-party apps:
- ClickMonitorDDC – Lightweight tool for adjusting brightness, contrast, and volume.
- Monitorian – Modern, easy-to-use app available in Microsoft Store.
- Twinkle Tray – Allows multi-monitor brightness control from the taskbar.
Tip: These tools work best with monitors that support DDC/CI (Display Data Channel/Command Interface). Enable it in your monitor’s OSD if needed.
Bonus Feature: Reduce Eye Strain with Night Light
Staring at bright blue light late at night can interfere with your sleep cycle. Windows 11 includes a Night light feature that applies a warmer tone to your screen.
How to Enable Night Light:
- Go to Settings > System > Display.
- Scroll down to Night light and turn it on.
- Click Night light settings to:
- Adjust color temperature
- Set a schedule (sunset to sunrise or custom times)
🧘 Ideal for evening use, especially when reading or working in low-light environments.
Accessibility Options for Vision Support
If you have vision sensitivities, Windows offers additional accessibility features that can enhance readability and reduce eye strain.
- Color Filters: Change display colors for color blindness or contrast issues.
- High Contrast Mode: Improve visibility by using a simplified color palette.
- Magnifier: Enlarge parts of the screen temporarily for better viewing.
Access these by going to Settings > Accessibility > Vision.
Troubleshooting: Brightness Slider Missing or Not Working?
Here are common reasons why the brightness control might not appear:
| Problem | Solution |
|---|---|
| Outdated or missing display drivers | Update your display drivers via Device Manager or your PC manufacturer’s website. |
| Generic display driver installed | Install the correct OEM-specific driver for your hardware. |
| External monitor not compatible | Use your monitor’s physical buttons or third-party apps like Monitorian. |
| Fast Startup interfering with controls | Disable Fast Startup viaControl Panel > Power Options > Choose what the power buttons do. |
Battery Life Tip for Laptop Users
To maximize battery life while working remotely or traveling:
- Keep brightness at 40–60% in well-lit environments.
- Lower it further in dim rooms.
- Turn off keyboard backlighting when not needed.
- Combine with Battery Saver mode for extra longevity.
Bonus: Reducing screen brightness is one of the simplest yet most effective ways to extend battery runtime.
Summary: Quick Reference
| Device Type | Method | How to Access |
|---|---|---|
| Laptop | Quick Settings | Windows + A |
| Laptop | Settings | Windows + I → System → Display |
| Laptop | Keyboard Keys | Fn + Brightness keys |
| Laptop | Auto Brightness | Available if light sensor is present |
| Desktop | Monitor OSD | Use physical buttons |
| Desktop | Software Control | Manufacturer apps or Monitorian |
| All | Night Light | System > Display > Night light |
Final Thoughts
Proper screen brightness is more than just a preference—it directly affects your comfort, productivity, and even health. Whether you’re using a sleek ultrabook or a multi-monitor desktop setup, knowing how to control and optimize brightness is essential in today’s digital world.
Make it a habit to review your display settings regularly. A few seconds of adjustment can lead to hours of visual comfort. Your eyes will thank you.
✔️You might also find these helpful:
▶︎How to Enable Dark Mode in Windows 11
▶︎How to Change Your Desktop Wallpaper in Windows 11
▶︎How to Automatically Sign In to Windows 11 (Skip Password)
💡 Looking for more tips? Check out our full list of Windows Help Guides.


