- 1 Who this guide is for
- 2 Before you start: keep your data safe
- 3 Step 1: Simple things that fix a lot
- 4 Step 2: Check if File Explorer is quietly hiding your drive
- 5 Step 3: Look in “Disk Management” (the most important check)
- 6 Step 4: Refresh the USB system in Device Manager
- 7 Step 5: Adjust power settings (USB may be half-asleep)
- 8 Step 6: If Windows says “You need to format the disk…”
- 9 Step 7: Try without hubs or long extension cables
- 10 Step 8: Signs of a failing USB drive
- 11 Prevention tips (small habits, big difference)
- 12 A simple mental flowchart (no drawing needed)
- 13 FAQ (quick and kind answers)
- 14 Wrap-up
Who this guide is for
If you plug in a USB drive and nothing appears in “This PC” (File Explorer), don’t panic. This guide is written for non-tech users—no jargon, no screenshots—just calm, clear steps. We’ll move from the safest checks to slightly deeper fixes, always with your data in mind.
Before you start: keep your data safe
Your files matter. The goal is to make the drive appear without erasing anything. When Windows suggests “Format this drive,” that’s not a casual message—it means Windows can’t read the contents as they are. Do not format unless you’re sure the files are backed up or you no longer need them. We’ll talk about that message later.
Step 1: Simple things that fix a lot
Start small. These checks solve more problems than you might expect.
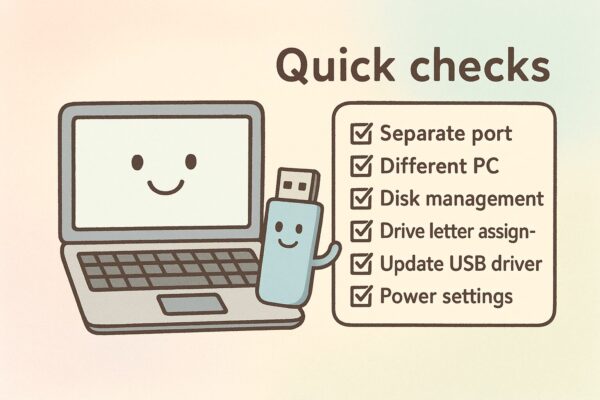
- Try a different USB port.
On laptops, switch to the other side. On desktops, try a port on the back (those get steadier power). - Try the USB drive on another computer.
If it shows up elsewhere, your USB drive is likely fine and the original PC just needs a small fix. - Try another USB drive on the same PC.
If another USB works, the problem may be with the first drive (format, file system, or hardware). - Restart the PC with the drive still plugged in.
A quick restart often resets the USB system and makes the drive appear.
If none of that helped, continue below. You’ve already ruled out several common issues.
Step 2: Check if File Explorer is quietly hiding your drive
Sometimes Windows tries to be “helpful” and hides empty or unusual drives.
- Open File Explorer (the folder icon) and select This PC.
- In the menu, open View → Show (or View Options), and make sure Hidden items is visible.
- Open View → Options → View tab (Folder Options).
- Turn off the option that says “Hide empty drives” (wording can vary slightly).
- Close and reopen File Explorer.
If your USB still isn’t there, let’s look underneath File Explorer—where Windows lists disks directly.
Step 3: Look in “Disk Management” (the most important check)
Even when File Explorer shows nothing, Windows may still see the device behind the scenes.
How to open it:
Right-click the Start button (Windows logo) → choose Disk Management.
What to look for:
In the lower list, you’ll see “Disk 0”, “Disk 1”, and so on. Find the one that matches your USB (it usually says Removable and shows a size similar to your drive).
Now, match your situation:
A) You see a healthy partition but no letter (no “D:”, “E:”, etc.)
Great—your data may be fine; Windows just hasn’t given it a letter.
- Right-click the partition area → Change Drive Letter and Paths… → Add → choose a letter (for example “E:”) → OK.
Your USB should now appear in File Explorer.
B) You see “Offline”
- Right-click the disk label (left side where it says “Disk 1” etc.) → Online.
C) You see “Unallocated” or no partition at all
This means Windows doesn’t see a usable file system right now. If you need the files, stop here and read the “If Windows asks to format” section below about recovery.
If you don’t need the files and just want to use the drive again:
- Right-click the unallocated area → New Simple Volume → follow the wizard to create a new volume, assign a letter, and format (choose exFAT for best cross-device compatibility, or NTFS if you only use Windows).
Friendly reminder: assigning a letter is safe; formatting erases the drive.
If the disk doesn’t appear in Disk Management at all, move to the next step.
Step 4: Refresh the USB system in Device Manager
Sometimes the USB “controller” (the thing that manages USB ports) gets stuck and needs a clean reload.
- Right-click the Start button → Device Manager.
- Expand Universal Serial Bus controllers.
- Right-click anything named USB Mass Storage Device and USB Root Hub (or similar) → Uninstall device.
(Don’t worry—Windows will reinstall these automatically.) - Restart your PC and plug the USB back in.
This refresh brings a surprising number of drives back to life.
Step 5: Adjust power settings (USB may be half-asleep)
On laptops especially, Windows may turn off USB parts to save battery.
- In Device Manager, under Universal Serial Bus controllers, double-click each USB Root Hub entry.
- Open the Power Management tab.
- Uncheck “Allow the computer to turn off this device to save power.”
- Repeat for each Root Hub you see, then restart.
If you use a power-saving plan, consider switching to Balanced or Best performance while you test.
Step 6: If Windows says “You need to format the disk…”
This message means “I can see something is plugged in, but I can’t read it.” It does not confirm that your files are gone. It only means Windows cannot interpret the contents as they are.
- If the files matter, do not format yet.
- Try the drive on another PC. Sometimes a different computer (or even macOS/Linux) can read it.
- Consider a read-only data recovery tool that scans without writing to the USB. If it finds your files, save them to another drive (never back onto the same USB).
- If no tool or computer can read it and the data is critical, look into a professional recovery service. They can be expensive, but they’re the safest option for physical failures.
If you don’t need the files, you may format to reuse the drive:
- For cross-device use (Windows/Mac/TV/cameras), pick exFAT.
- For Windows-only use, NTFS is fine.
Step 7: Try without hubs or long extension cables
USB hubs (especially bus-powered ones) and long extension cables can cause power problems. Plug the drive directly into the computer. If you need multiple ports, consider a self-powered hub (one with its own power adapter).
Step 8: Signs of a failing USB drive
If the drive doesn’t show up on any computer, or you notice things like:
- the LED never lights,
- unusual heat,
- strange sounds, or
- it connects and disconnects repeatedly,
stop using it. Each new attempt can make recovery harder. If the files are important, seek professional help first.
Prevention tips (small habits, big difference)
- Always use Safely Remove Hardware before unplugging.
- Avoid bending the USB stick or leaving it plugged in where it can be bumped.
- Keep backups of important files in two places (for example, computer + cloud).
- If you rely on hubs, choose a self-powered model.
A simple mental flowchart (no drawing needed)
- Try another port → try another PC → try another USB on your PC → restart.
- Still missing? Open Disk Management → assign a drive letter if possible.
- Not there or unreadable? Device Manager refresh → power settings check.
- “Format this drive” message? Don’t format if you need the files → try another OS/computer or a read-only recovery tool.
- No luck anywhere and data matters? Professional recovery. If not, format and reuse.
FAQ (quick and kind answers)
Q. Will assigning a drive letter erase my files?
A. No. Assigning a letter is safe. Formatting is what erases files.
Q. Which format should I choose?
A. exFAT if you want to use the drive across Windows/Mac/TV. NTFS is great for Windows-only use.
Q. My drive shows as “Unallocated.” What does that mean?
A. Windows can’t find a usable file system. If you need the files, try recovery first. If not, create a new simple volume and format.
Q. Is it okay to keep trying different fixes over and over?
A. Be gentle. The first recovery attempt often has the best chance. Avoid repeated formatting or heavy writes until you’ve rescued files.
Wrap-up
Most “USB not showing up” issues are fixable with calm, patient steps. Start with simple checks, then use Disk Management to assign a letter, refresh the USB system, and review power settings. Keep formatting as a last resort. With a little care, you’ll often bring the drive—and your files—back into view.
Related Articles
・English Article (HTML format, 2025 Updated, Beginner-Friendly)
・How to Show File Extensions in File Explorer (Beginner-Friendly)
・How to Fix: BitLocker Recovery Key Requested After Windows Update – Full Guide for Beginners
・How to Enable Dark Mode in Windows 11 (Step-by-Step for Beginners)


