- 1 Introduction: Why Are Some Files Hidden?
- 2 1. What Are Hidden Files in Windows?
- 3 2. Method 1: Show Hidden Items via File Explorer
- 4 3. Method 2: Show Hidden Files via Folder Options
- 5 4. Method 3: Show Protected Operating System Files (Advanced Users)
- 6 5. Method 4: Use Command Prompt or PowerShell (Advanced)
- 7 6. Troubleshooting: Hidden Files Still Don’t Appear?
- 8 7. Extra Tips and Safety Notes
- 9 Conclusion
Introduction: Why Are Some Files Hidden?
By default, Windows hides certain files and folders to protect critical system data and reduce clutter. These include configuration files, AppData directories, and system restore files.
However, you may sometimes need to view these hidden files—for example:
- Accessing configuration data for troubleshooting.
- Copying application settings or backups.
- Cleaning up leftover files that are taking up disk space.
In this guide, you’ll learn several methods to view hidden files and folders in Windows 11 (and Windows 10). We’ll cover File Explorer, Control Panel, advanced settings, and even Command Prompt/PowerShell. Each method includes step-by-step instructions and helpful tips
1. What Are Hidden Files in Windows?
Hidden files are files marked with a hidden attribute that makes them invisible in File Explorer by default.
There are two levels:
- Regular hidden items (user folders like AppData, temp files).
- Protected operating system files (critical files like boot loader data). These are hidden for safety reasons.
Important: Viewing or modifying system files without understanding them can cause system instability. Always make backups before making changes.
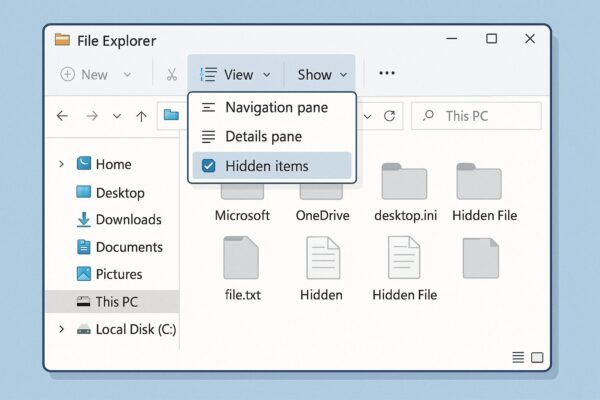
2. Method 1: Show Hidden Items via File Explorer
This is the quickest way for most users.
Steps:
- Open File Explorer (press Windows + E).
- Navigate to any folder (e.g., C:\Users\YourName).
- In the menu bar, click View.
- Hover over Show.
- Check Hidden items.
Hidden files and folders will immediately appear semi-transparent. You can toggle this off later by unchecking it.
Tip: This setting applies system-wide; you don’t have to repeat it for each folder.
3. Method 2: Show Hidden Files via Folder Options
If you want a more advanced and permanent setting:
Steps:
- Open File Explorer.
- Click the three-dot menu (…) on the top ribbon and choose Options.
- In the Folder Options window, click the View tab.
- Under Advanced settings, look for:
- Show hidden files, folders, and drives → Select it.
- Hide protected operating system files → Leave checked unless you need system files.
- Click Apply and OK.
This method provides finer control and is similar across Windows 10 and 11.
4. Method 3: Show Protected Operating System Files (Advanced Users)
Sometimes you need to see critical system files for troubleshooting.
Steps:
- Follow the Folder Options steps above.
- Under Advanced settings, uncheck:
- Hide protected operating system files (Recommended).
- You’ll see a warning dialog—confirm by clicking Yes.
- Click OK to save changes.
Warning: These files are crucial for Windows. Do not delete or modify them unless you know exactly what you’re doing.
Best practice: Back up your system or create a restore point before making changes.
5. Method 4: Use Command Prompt or PowerShell (Advanced)
For power users, you can list hidden files from the command line.
Using Command Prompt:
- Press Windows + S, type cmd, and press Enter.
- Navigate to the folder you want, e.g.,
3. Use the command:
This lists all files including hidden and system files.
Using PowerShell:
1. Press Windows + X → Windows Terminal (Admin).
2. Navigate to the folder.
3. Run:
The -Force parameter shows hidden items.
This method is especially useful for automation or troubleshooting when GUI access is limited.
6. Troubleshooting: Hidden Files Still Don’t Appear?
If files remain hidden after enabling the above options, check:
- Group Policy settings (in enterprise environments).
Run gpedit.msc → User Configuration → Administrative Templates → Windows Components → File Explorer → Ensure “Do not show hidden files” is not enforced. - Antivirus or security software may hide suspicious files automatically.
- Corrupted user profile settings—try on another account to confirm.
7. Extra Tips and Safety Notes
- Common hidden folders:
- %AppData% (e.g., C:\Users\YourName\AppData)
- ProgramData, Temp, and cache directories.
- Backup before changes:
Use an external SSD or cloud storage to prevent accidental data loss. - Reset view:
If you no longer need hidden files visible, toggle Hidden items off in File Explorer for safety.
Before you wrap up, here’s an important tip: whenever you’re about to make changes like showing hidden files or upgrading Windows, it’s a good idea to secure your important data first. A simple backup can save you from unexpected issues later.
[Affiliate Disclosure]
Before any major Windows updates or system tweaks, it’s wise to secure your files.These compact, reliable tools make backups and upgrades much smoother.
Conclusion
Enabling hidden files and folders in Windows 11 is simple but must be done carefully. The File Explorer method is ideal for casual users, while Folder Options and command-line tools give more control for advanced users.
Once done, you’ll have greater visibility of your system for troubleshooting, customization, and file management.
Related Articles You Might Like
▶︎Essential Windows Tips for Working Safely and Comfortably Outside
▶︎OneNote for Windows 10 Support Ending: What’s Happening and How to Prepare
▶︎WSUS Clients Not Updating? Common Causes and How to Fix Them
▶︎Create a System Restore Point in Windows 11 (Beginner-Friendly Guide)
▶︎How to Check Your IP Address in Windows 11 (Beginner Guide)


